Isle of Sgàil Roulette Guide
A comprehensive guide to Hitman Roulette on The Ark Society
|
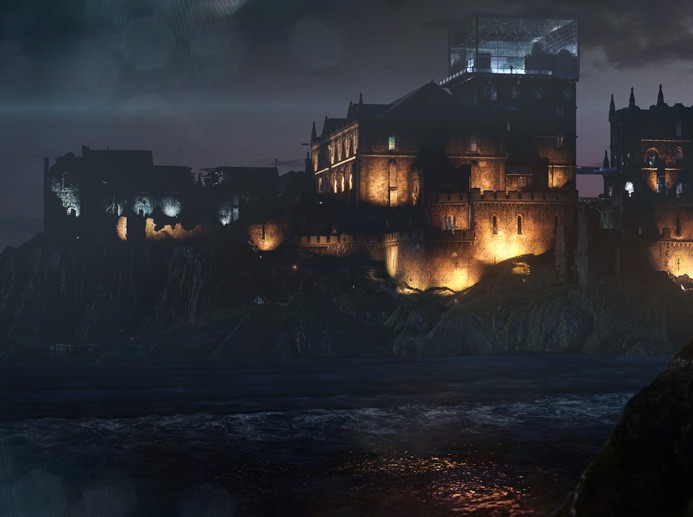
Isle of Sgàil is a Season 2 map and the twelfth map in the Roulette Trilogy map pool. Its mission, The Ark Society, features two targets, Zoe Washington and Sophia Washington. Sgàil is considered the hardest two-target map and the second-slowest after Marrakesh. The main reasons for this are the map's verticality, the large trespassing areas, and the long list of lethal melees that need to be learned. It is also difficult to find the perfect template for each spin, but one advantage of the map is that players can usually fall back on Sophia Radio timing at around 1:55, and Zoe is usually easy to isolate with an emetic or a Flash Phone. To compete on Isle of Sgàil, players are encouraged to reach Mastery Level 18, as the last and most powerful starting location (Architect) is locked behind it. The final two levels unlock a niche Hidden Stash and a rarely used Remote Concussion Rubber Duck.
Map Guides use a three-color system to classify strategies and templates:
🟢 Essential knowledge for getting started on the map. 🟡 Intermediate techniques that help players compete on a wider range of spins. 🔴 Advanced methods that help solve even the toughest spins quickly. |
|
||||||||||||
Planning

Isle of Sgàil features eight starting locations, with all of them having their uses. The most important start is Architect; nothing else can compete with its disguise access and proximity to Sophia.
When isolating Zoe first is the goal, the Custodian, Ark Member and Chef starts can all prove useful, depending on the disguises needed. Both viable suit starts, Chapel and Keep, naturally lead toward early Zoe isolations as well.
The only two starts that are rarely used are Event Staff and Harbor, which are mainly used for some Initiate and Starfish spins, respectively.
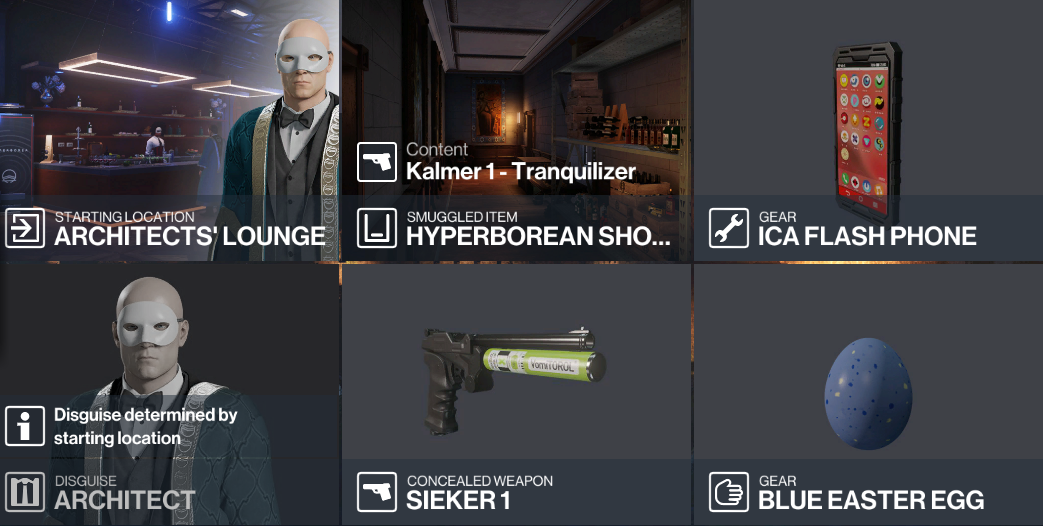
In most Isle of Sgàil spins, target isolations are done using just one item: the Sieker or the Flash Phone. For this reason, default loadouts in Sgàil are quite flexible; players can get away with bringing one or both key items and still leave space for the rest of the spin.
For the above reasons, the firearm slot is typically taken by either the Sieker, or a Pistol if someone only uses the phone. In either case, most spins should allow for a Flash Phone in the first Gear slot, but this can be swapped to an emetic item if needed. No other item is really needed for Isle of Sgàil spins, so the other Gear slot can be used for a Blue Egg for disguise grabs, or a Lockpick for easier traversal.
As for a smuggle, the clear best choice is the Hyperborean Showrooms next to the Architect start. Alternatively, there are viable briefcase spots in the Chapel and the Morgue as well, the latter being especially useful for early Zoe kills.
Strategies
Although Isle of Sgàil is a vertical map where traversing in trespassing disguises can be difficult, the targets' relatively short cycles partly make up for this. Of the two targets, Zoe is generally easier to isolate, with effective emetic and phone-based strategies available throughout her cycle. Sophia, meanwhile, has fewer effective options after the radio timing (around 1:55) and before her second cycle begins (around 3:30).
Beyond the individual target isolations, learning the Double Phone Lure should be an important goal, as it allows players to reach both targets in just 40 seconds, simplifying many regular spins. Though execution heavy, the strategy forms the basis of the map's most effective template.
🟢 Zoe Bathroom (Sieker): The simplest and most flexible way to isolate Zoe.
Throughout her cycle, Zoe can almost always be isolated in a bathroom using an emetic item:- From 0:30 to 0:35 (second cycle 3:12), she is talking to a guard and can be made sick from Architect start or next to the cellar door.
- From 0:55 to 1:05 (then 3:40), she is in the Gallery and can be made sick from the corner behind her.
- From 1:15 to 1:25 (then 4:05), she is having a proxy conversation with Cornelia and can be made sick from the bathroom.
After being made sick at any of these points, Zoe walks to the Gallery bathroom. Her guard initially stays outside but enters about a minute after Zoe is KOd or killed, so either Zoe's body must be hidden or the guard must be lured in. By dragging Zoe next to the sink or the box, it is possible to exit the room without her body being seen.
🟡 Zoe Phone Lure (Flash Phone): A versatile early Zoe isolation that works well with Sophia kills.
The fastest way to isolate Zoe is to intercept her at the wake area around 0:15. Drop the Flash Phone at the bottom of the pipe under the glass bridge and ring it as Zoe approaches. She will investigate the phone, allowing her and her guard to be KOd. The same lure also works on the second cycle at around 3:00, although the closest guard may be out of position, so make sure he cannot see Zoe KOd or killed. The setup varies depending on the starting location:- 🟢 Ark Member: drop the phone, then bump the closest guard before ringing it.
- 🟢 Custodian: fully bump Zoe before dropping and ringing the phone.
- 🟡 Chef: take the ladder and cue the harpist's music to turn Zoe back outside; bump the guard twice and mind the wake crowd during the KOs.
- 🔴 Architect: throw the phone from the glass bridge, wait for the guard to leave, or distract or emetic him before ringing the phone.
- 🔴 Keep: bring a pistol, fire at the table to perform an itemless boost, distract the guard, then quickly drop and ring the phone.
🟡 Zoe MoC Lure (early: Sniper Rifle): A mission story to bring Zoe away from the castle.
This lure can be performed either at the beginning of the spin or later on. For an early MoC Lure, start Chapel and snipe the money pit to make Zoe head there. Distract the guards to get into the MoC Room, then shoot the box to lure the Master of Ceremonies to it. This allows both him and the guard to be KOd and hidden before Zoe arrives with her guard at around 1:05. The distance between Zoe and her guard is inconsistent, so be mindful of their positioning or place a coin to stop her guard.The same trigger can also be used for a second kill: infiltrate and clear the room with thrown distractions or sedatives before exiting the room toward the two guards. Once the guards see 47 as the MoC, they notify Zoe that the ceremony can begin, and the rest of the isolation plays out the same way as in the early version.
🔴 Zoe Basin (weapon): A niche Zoe isolation, far from her usual bathroom.
As Zoe leaves the VIP Lounge at 2:10, she can be lured to a quiet corner next to a basin. Place a weapon on the carpet and let Zoe report to her guard; once he leaves, throw an item next to the basin wall so that she investigates it.Alternatively, make her sick at around 2:15 to 2:20 and take care of her guard the same way. While this method can be simpler, the basin itself is rarely seen by roaming NPCs.
🟢 Sophia Radio (itemless): Sophia's trademark isolation, using a radio at around 1:50 to 2:02.
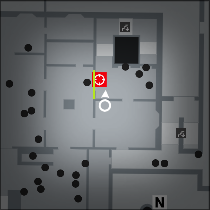 Sophia has a simple itemless isolation opportunity as she walks by the Hyperborean bathroom, just before going downstairs. At around 1:50 to 2:02 (or around 2:25 from Architect start), interact with the radio in the side room as she passes the doorframe: she will react to it and enter without her guard. Ideally, kill her immediately, but she can also be dragged behind the couch where she won't be found.
If the timing is missed and the guard has been pulled, locking down Sophia by shooting the painting can sometimes recover the run, although it is not a consistent backup.
🟢 Sophia Bathroom (Sieker): Lure Sophia to a bathroom early or late, with or without an item.
There are several ways Sophia can be lured to the bathroom on the Hyperborean floor:- Start Architect and make her sick through the curtain immediately,
- Emetic her as she passes by the radio room (around 1:55), or lure her inside first for safety,
- Wait inside the bathroom and turn on the radio as she approaches the radio room (around 1:45).
In none of these cases will Sophia's guard ever enter the bathroom, but it can still be useful to lure him in for an exit disguise. Once Sophia is downstairs, use a niche angle in the gallery to make her sick at 2:50; she'll reach the gallery bathroom at 3:40.
🟡 Sophia Peekaboo (itemless): A trespassing backup for Sophia at around 3:25.
Before starting her second cycle, Sophia takes the staircase back up to Architect start, giving you a long peekaboo into the corridor. The earliest opportunity is around 3:25, but triggering her phone call downstairs can delay it by up to a minute.🔴 Sophia Phone Lure (Flash Phone): The fastest, but most technical Sophia isolation.
From Architect start, bump Sophia to turn her toward the curtain, then place the phone just in front of it. When she reacts, pick up the phone, drop it again by the side room door, and quickly ring it. Sophia will react again and isolate herself by 0:17.🔴 Double Phone Lure (Flash Phone, Briefcase): Isolate both targets in the first 40 seconds.
A Sophia Phone Lure can be extended to also isolate Zoe at the wake, but slight variations and tighter execution are required. After luring Sophia to the door, pick up your briefcase, then the phone and drop it below the glass bridge and ring it again. KO Sophia as she approaches the door, and slide down the pipe to Zoe, who should already be walking toward the phone.Disguises
Disguises on Isle of Sgàil are generally static, and are acquired in similar ways at the start and end of spins. While one grab per disguise is enough to complete spins, it is useful to know how to reach Sophia by radio timing for each disguise, as well as a nearby grab that can chain into a phone or emetic lure on Zoe.
Other than Suit, some disguises can heavily influence how a spin is played. Butler requires a long, usually item-heavy grab, Entertainer a long emetic grab, Knight's Armor a trip to the penthouse, and Master of Ceremonies is usually accompanied by an MoC lure.
Disguise resources for Isle of Sgàil
| Disguise | How to get | Disguise | How to get | ||

|
Suit | Starting disguise (Keep or Chapel); cannot be acquired otherwise |

|
Elite Guard | Personal guards of both targets | Thrown lure at the door from Architect start |

|
Architect | Starting disguise | Peekaboo into Hyperborean smuggle | Throw into Radio Room | Lure behind the wall near Gallery |

|
Entertainer | Emetic wallbang from Architect start | Sieker from Council floor | Free in Courtyard Closet |

|
Ark Member | Starting disguise | Rack Case below MoC, silent attack | Stone Circle sedate | Cannon at Basin | Blegg below Radio Room |

|
Event Staff | Under Architect start, throw at right painting | Below Wake, next to Kitchen | Rarely used starting disguise |

|
Blake Nathaniel | Micro Audio from Sophia Bathroom, left of toilet | Necklace Security, blegg the trio | Starts roaming 2:00, emetic after |

|
Guard | Wake area tall grass, lure to Stone Circle | Gallery Storage Room | Necklace Security, blegg the trio | MoC Room |

|
Burial Robes | Morgue clearout with Fusebox lure or Tranq, then illegal Chloroform throw | Bodyshot from top of stairs |

|
Initiate | Cycling below MoC Room, lure behind the curtain or push |

|
Butler | Blegg or Tranq recommended, approach from outside | Itemless lineups | Constant takes the Helicopter exit if bodies are found |

|
Jebediah Block | Peekaboo from Radio Room | Rooftop Phone Lure over the corner | Dodge the sentry guard, generator lure and tranq |

|
Castle Staff | Next to Architect start, open the door and throw behind him in the corridor |

|
Knight's Armor | Remote-only disguise | Get an Elite Guard disguise, approach the top with a keycard or climb up the pipe, KO all 3 guards |

|
Chef | Starting disguise | Distract the lady in the Kitchen and ring the phone | Bump her and thrown lure | Ice Machine slow |

|
Master of Ceremonies | From Chapel start, shoot the box and KO the guard before the MoC | From the Helipad, throw behind the guard and at the box |

|
Custodian | Starting disguise | Necklace Security, blegg the trio | Gallery Storage Room | MoC Room |

|
Raider | Under Architect start, throw at left painting | Hyperborean triple shot or peekaboo | Gallery Storage | Morgue Fusebox |
Kill Methods
Kill methods on Isle of Sgàil are not necessarily difficult, but some are only viable during certain parts of the targets' cycles, while others become significantly more difficult in a trespassing or hostile disguise. In general, any loud kills have to be handled with care for either target. For Zoe specifically, Fire is considered the toughest kill if an Oil Canister cannot be brought, while Fall can be very long-winded in a disguise that cannot easily access the cliffs. For Sophia, both Fall and Falling Object are accidents that can either be completed quickly and easily or require longer and more restrictive routes.
Kill method resources for Isle of Sgàil
| Kill Method | Zoe Washington | Sophia Washington | |

|
Loud Kills | Gallery Bathroom, push against the wall | Phone Lure, shoot from afar or the glass bridge | MoC Room, shoot and hide | Sophia Bathroom, lure her guard in | Radio Room, lure the Raider down | Sophia Peekaboo, box in the corridor |

|
Loud Live Kills | Gallery Bathroom, push against the wall | Phone Lure, shoot from Morgue door | Sophia Bathroom, lure her guard in, tight | Radio Room, lure the Raider and Sophia | Sophia Peekaboo with Briefcase |

|
Impact Explosive | Gallery Bathroom, throw at the wall to the right of her head | Phone Lure, tranq the Elite Guard and dump Zoe | MoC Room, kill and hide | Sophia Bathroom, lure her guard in | Radio Room, lure the Raider down | Sophia Peekaboo, box in corridor |

|
Consumed Poison | Banned for Zoe Washington | Banned for Sophia Washington |

|
Drowning | Gallery Bathroom simplest, several angles | Basin slightly risky, depends on cycles | MoC Room best when trespassing | Emetic from Architect start or Radio Room into Sophia Bathroom | Gallery angle for a downstairs kill |
|
Electrocution | Gallery Bathroom, remote if tucked under the sink | MoC Room can be itemless | Helipad EMP 1:35 (high FPS) | Emetic into a bathroom is the only real solution |

|
Explosion (Accident) | Nearby propanes in the Morgue and the MoC Room, Oil Canister is rarely used for Zoe | Nearest propanes are in the Constant Tower, Oil Canister can be considered |

|
Fall | Phone Lure spot, dump her off the cliff, WAIT for the kill to register | Above MoC Room, long drag | Radio Room, push or loud dump, then dump again | Glass Bridge, watch for cycling guards |

|
Falling Object | In and outside Gallery Bathroom | MoC Room, can be remote | Gibbet at Wake, around 2:30 | Radio Room shot, can be remote | Raider Room snipe, distract guard first |

|
Fire | Bringing an Oil Canister is simplest | Phone Lure and Sieker to Morgue | MoC Lure: Barrel outside or distract to Effigy | Banned for Sophia Washington |
With 19 different items (as well as the generic Fiber Wire and Neck Snap), Isle of Sgàil has the most Melee kill options in the trilogy. Quite a few of them are unique large items, with longer detours needed for Battle Axe, Hatchet, Sapper's Axe and Viking Axe, among others. Also, this is the only map where a Fiber Wire variant (Aztec Necklace) can appear as a separate kill condition.
Lethal melee resources for Isle of Sgàil
| Item | Description | Item | Description |
| Fiber Wire | Bring it for Fiber Wire spins | See Aztec Necklace | Letter Opener | ONLY in the Radio Room |
| Aztec Necklace | Ark Member or Custodian start, disable the Fusebox, steal from cover | Laptop at Blake Security, legally steal as Blake | Old Axe | Of the two, only the one above Architect start is viable |
| Battle Axe | Below Chapel start, above the MoC guards | In the Penthouse | Saber | Above the Gallery in glass case, throw Briefcase at it | Upper floor of Constant's Office |
| Broadsword | Smuggle (Large), otherwise big detour to the Penthouse | Sacrificial Knife | Banned for both targets |
| Circumcision Knife | ONLY edge of Warehouse, next to Secret Tunnel, shoot the crate; enter/exit with SMG or Lockpick | Sapper's Axe | ONLY in the Penthouse |
| Cleaver | ONLY in the Kitchen, in front of 47 from Chef Start | Scalpel | ONLY next to Janus on the table in the Morgue |
| Fire Axe | Of the three, the one in the Gallery is the best | Scissors | Vacuum Room under Architect start, where Event Staff is grabbed |
| Hatchet | ONLY above Morgue, locked door, Raiders hear triple shot on door | Screwdriver | Behind Hyperborean Showroom | Corridor next to Gallery Hidden Tunnel, Lockpick | Helipad, close to exit | East Wall exit |
| Katana | ONLY in the Gallery | Starfish | ONLY at default start, triple shoot the boat then the wooden panel next to the Boathouse |
| Kitchen Knife | In the Kitchen, next to the door to Cellar | In the Stronghold Showroom | Viking Axe | In Constant's Library, in glass case, throw Briefcase at it | In the Courtyard Closet with free Entertainer |
Templates
Isle of Sgàil has a relatively high number of different templates, making it difficult to choose one immediately. However, making that choice quickly is advantageous, as quite a few templates can lead to fast and straightforward completions.
Templates on this map fit into two groups. Double Emetic and Double Phone are generic starter templates that bring down both targets efficiently, but both kills need to fall into place for them to be effective. The other templates focus on taking down Zoe or Sophia first: these can be even more efficient, but carry a risk of missing or complicating the other target.
Only a few things can point to an obvious template. A disguise like Ark Member can suggest a Zoe First from that start, while disguises in the MoC Room usually invite a Chapel Start. Otherwise, it is generally fine to start Architect and go for a double isolation, simplifying both long and short spins.
🟢 Double Emetic (Sieker)
The oldest template on Isle of Sgàil consists of starting Architect, isolating Sophia by making her sick, and doing the same to Zoe at around 1:15. This is a safe but potentially slow introductory template for the map, but it can sometimes result in fast, potentially record-breaking spins as well. Double Emetic shines best with at least one remote kill or disguises that are close to either target: Architect, Castle Staff and Elite Guard upstairs, or Custodian and Guard downstairs.🟢 Zoe First (Flash Phone)
Several templates break if Suit or live kills are involved, but Zoe First (also known as Phone and Radio) is the easiest variant that allows for both. If the Sophia kill is easy or her required disguise can be acquired without a big detour, it is ideal to start anywhere that allows for a Zoe kill at the cliffs at around 0:35, before heading to the Sophia Radio Room by 1:55. For this template, Ark Member, Custodian and Chef are typical examples of Zoe disguises that can be made easier by starting there.🟡 Sophia First (Flash Phone or Sieker)
Some spins naturally follow a Zoe-into-Sophia order, while others start with Sophia and end with Zoe. By going Sophia First, players can tick off the more time-sensitive target before going to the one that is more approachable with just a phone or an emetic item. Examples of Sophia First spins include Initiate spins, spins with an early detour to the Penthouse, or spins where a tougher Zoe kill needs to be done at a certain time.🟡 Chapel Start (Sniper)
Chapel Start is a relatively execution-heavy template that solves a niche category of spins really fast. If the spin involves any two of the disguises in the MoC Room (Master of Ceremonies, Guard, Custodian), as well as Suit, the Zoe kill can potentially be done while still making the 1:55 Radio Room timing. Depending on Zoe's speed and the first kill, reaching Sophia can be tight, so players should hop outside the MoC Room by 1:17 to make her timing. If the Zoe setup takes a long time, it is okay to leave her kill second, as she's not far from the intended Helicopter exit anyway.🔴 Double Phone (Flash Phone, Briefcase)
Over the years, the Double Phone template has emerged as the default approach for tackling the widest range of spins. This execution-heavy strat allows both targets to be isolated by 0:40 from Architect start. Its main benefit is that it allows players to start fetching difficult disguises or kill items earlier than any other template, but the drawback is that live kills don't work here.🔴 Phone and Sieker (Flash Phone, Sieker)
An up-and-coming template, Phone and Sieker combines the benefits of an early Sophia isolation with a flexible Zoe approach. Starting from Architect, isolate Sophia and drag her to the corridor before making Zoe sick from a floor above. This gives time until 2:05 to fetch the item and disguise for her before moving back onto Sophia. This template is ideal for medium-difficulty Zoe kills combined with longer Sophia kills without live restrictions.Useful Info
The following section covers useful rules of thumb, additional mechanics, and other information about Isle of Sgàil and its targets.
Map Traversal
Isle of Sgàil is a difficult, vertical map, made even more challenging when a target has to be reached in a trespassing disguise. The following routes can help complete spins more easily:- Cliffs to Sophia: Once Zoe is isolated at the cliffs, Sophia is typically reached by climbing the pipe under the glass bridge. The fastest way to reach the Radio Room is to climb up one floor, dodge the enforcers by sticking to the wall, walk up the stairs and climb inside the window. Alternatively, climb up two floors and peekaboo the Architect inside to get a useful exit disguise.
- Sophia to Zoe: After Sophia is isolated or killed, Zoe can be easily reached in a non-trespassing disguise by taking the stairs or pipes down to the Gallery floor. If the disguise or the kill requires an MoC Lure, the MoC Room can also be reached in a trespassing disguise by crossing the Helipad on the left side, making sure not to peekaboo the Raiders.
- The Penthouse: For Knight's Armor and Sapper's Axe spins, players must traverse up to the Penthouse. For the best outcome, acquire an Elite Guard disguise with an SMG and take the stairs up, or use the pipe if no keycard is acquired. For the armor, KO the outside guard and the two inside guards. On the way down, you can throw an item at the camera to avoid yellow guns.
- Exits: The closest exit is always clear if Zoe is the second kill: either the Helicopter or the East Wall. From Sophia's floor, the Helicopter exit is closer if a non-trespassing disguise is available or the player is comfortable with bodyshots.
Cameras & Evidence
Although there are 16 cameras on Isle of Sgàil, players only have to mind a few of them, mainly when going up to the Penthouse and while traversing Sophia's floor. If someone is caught on camera, evidence can be deleted in the Hyperborean Security Room near Sophia by shooting the door open first, shooting from outside, or shooting the camera box next to the MoC Room.The Constant
The Constant is a unique NPC in the trilogy: he has proximity-based cycles, meaning he'll remain close to 47 throughout the spin. Starting his cycle in the Penthouse, he can become a factor if the Constant's Tower is entered late, as he will likely find bodies at the Butler. He can also path toward Jebediah Block through the Radio Room and the Hyperborean corridor, finding Sophia or other bodies if they are not hidden well.Once the Constant is panicked by loud guns or finding bodies, he will lock down and exit via the Helicopter, making that exit unavailable. For this reason, it's important to consider whether a different exit should be used, including the tight Custodian exit featuring locked doors and cameras.
Sophia Bathroom Lures
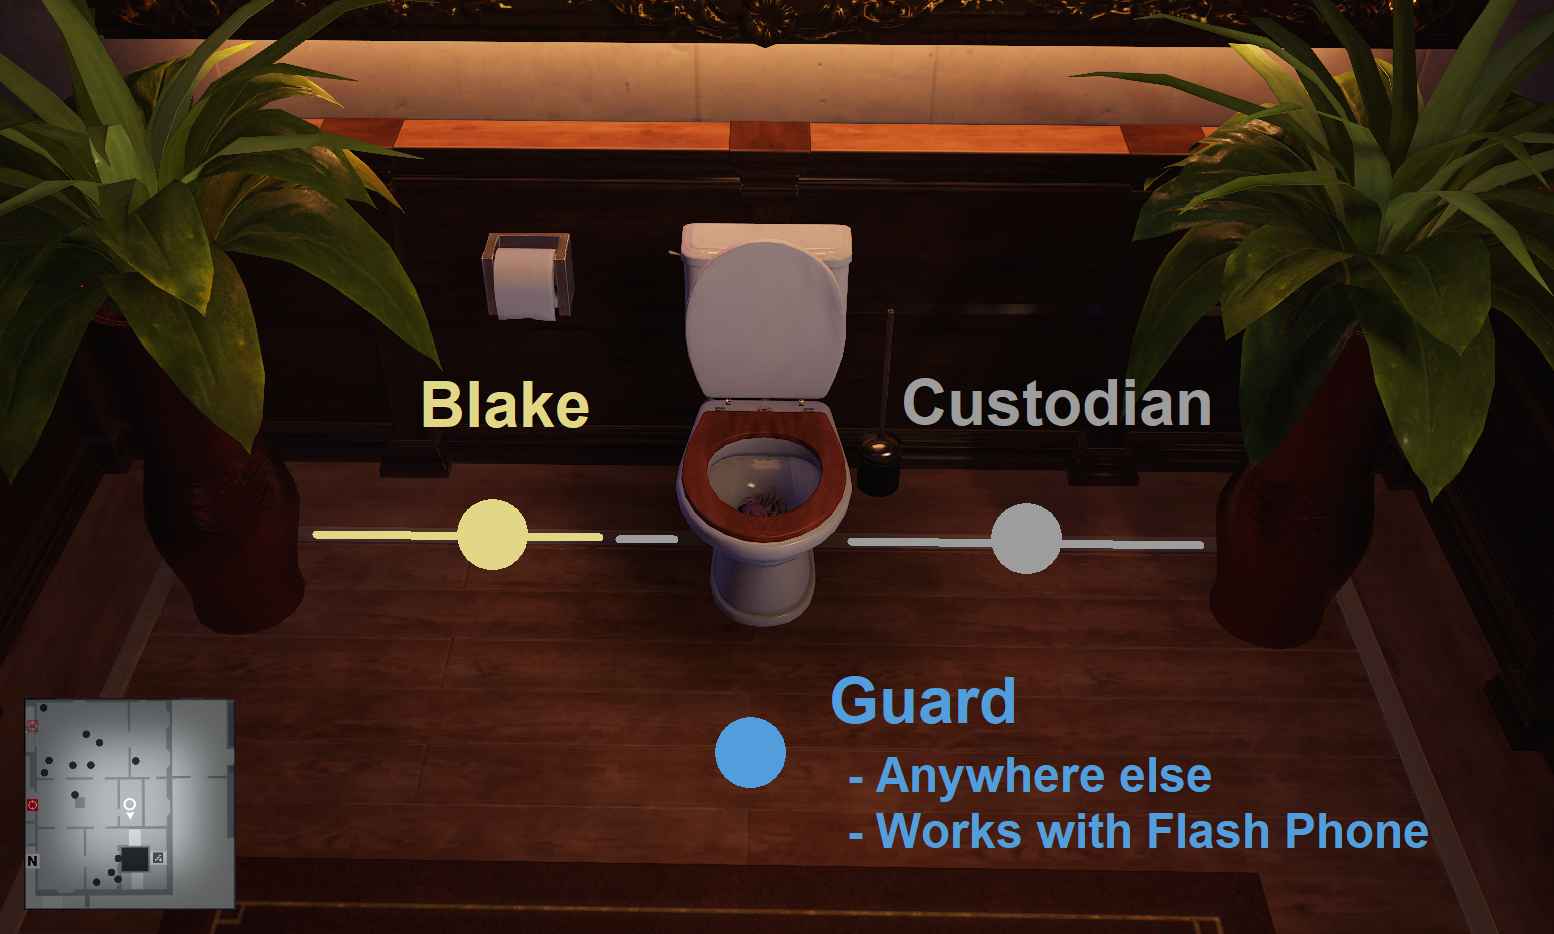 Sophia's Bathroom on the Hyperborean floor has broken audio properties, allowing NPCs from outside the room to be lured in, even with the door closed. Although only the Blake Nathaniel grab is meta here, the ICA Remote Micro Audio Distraction device can also be used to lure a Custodian by putting it on the other side of the toilet, or a Guard by putting the device anywhere else. The same guard can also be lured up by placing the Flash Phone anywhere in the room.
Further Learning
The following strategy is not commonly used in the current Isle of Sgàil meta, but understanding it can be useful for players aiming to master the map.
Phone into MoC Template
A Sophia Phone Lure doesn't necessarily have to continue with a Zoe emetic strat. As this example spin by Moo shows, starting with Sophia and triggering the MoC Lure second can sometimes be faster than the usual order (see the Chapel Start template). In general, it is useful to learn the fastest way to initiate the MoC Room, as shown in this example.Below is a list of useful links and resources regarding Isle of Sgàil Roulette:
- Every Isle of Sgàil Spin in Roulette Rivals, a comprehensive list by RRStats
- Every Isle of Sgàil Spin from RRWC25 by In4Fun
- Target cycles (Zoe Washington, Sophia Washington) by BluntsNBeatz